How to turn WMA into MP3 with iTunes
Although most of the songs that you can download from the Internet are in MP3 format sometimes you happen to come across WMA files, a format developed by Microsoft and widely distributed on PC. This is a type of file that can be reproduced without any kind of problem on the vast majority of computers.
However, there are different situations in which it may be useful to convert WMA files to MP3 and if at this time you find yourself here, reading these lines, it is clear that, you have the aforementioned requirement, and that you would like to understand how to succeed ” in the enterprise ” Using iTunes. If things are actually this way, and if you need a small tip then to know that this time you can count on me. With today’s guide, I will go to tell you everything you need to do to be able to turn WMA into MP3 with iTunes.
Before you can scare and think about the worst, I want to clarify right away that it is a simple operation to do and that everyone, even someone who is a bit like you, is not exactly expert in new technologies can perform without problems this type of procedure.
That said, if you are willing to understand how to turn WMA into MP3 with iTunes, I suggest you take a few minutes of free time, to sit comfortably in front of your computer and focus carefully on reading the next lines. I am more than sure that in the end, you will be ready to say that turning WMA into MP3 with iTunes was actually a real breeze and that on the first good occasion you will be well available to explain to your friends in need of a similar straight how to do. But now… ban alliance and proceed!
Depending on whether you own a PC or a Mac, the procedure to be able to transform WMA to MP3 with iTunes is different. In the first case, you just use the appropriate functionality designed for Windows operating systems attached to the Apple media player, in the second case, I’m sorry to tell you, but … it is not a feature included ” standard ” in the OS X version of the program so all you can do is use third-party software to convert WMA files to MP3 and then import them into iTunes. I know, the solution is less practical than that for Windows PC, but I can assure you that it’s easier to do than to say!
Turn WMA into MP3 with iTunes on PC
If you have a PC, and you have installed the famous Apple player, and you are interested in understanding how to turn WMA into MP3 with iTunes the first thing you need to do is to start the software. To do this presses the Start menu, type itunes in the search field that is shown to you and then click on the first result in the list. Alternatively, double-click on the iTunes icon on the desktop.
Then wait for iTunes to be visible on the screen and then press the icon in the shape of a musical note that is placed on the top left, click on the label Music always on top and then click on the rectangle placed in the upper left part of the window of the program. Later, presses on Preferences. In the new window that at this point is shown to you click on the button Import Settings… then select MP3 encoder from the drop-down menu located next to the Import. If necessary, define the sound quality level of the important files using the drop-down menu next to the Settings item: then click OK twice consecutively.
Now, click on the File item at the top left of the iTunes window and then select the item Add file to the library … attached to the menu that is shown to you. If you cannot see the File item in the iTunes window, you need to enable the menu bar to display. To do this click on the rectangle placed in the inhaled part to the left of the program window and select the Show menu bar item from the menu that is shown to you. Then select the file in WMA format stored on your computer that you intend to turn into MP3 with iTunes and then click on Open and then presses the button Convert. Repeat this process for every single song you want to convert from WMA to MP3 with iTunes.
As an alternative to the procedure, I just mentioned you can add tracks in WMA format to convert to MP3 in iTunes simply by pressing the icon in the shape of a musical note placed in the upper left part of the player window, by clicking on the item Music placed in high and drag directly into the program window the files you want to turn into MP3.
Then wait for a few moments for the song or songs to be added to the iTunes library and then check that your music collection has been properly updated by taking a look at the Music section of the player.
Turning WMA into MP3 with iTunes on Mac
If you’re using a Mac, and you’re interested in understanding how to turn WMA into MP3 with iTunes, keep in mind that, as I mentioned in the previous lines, it is not an operation that can only be done using the multi-media player of the bitten apple.
The OS X version of iTunes does not include a special feature that lets you convert WMA to MP3. To do so you will have to resort to the use of special software for third-party conversion and then, if necessary, you can import the transformed songs from one format to another in the iTunes library.
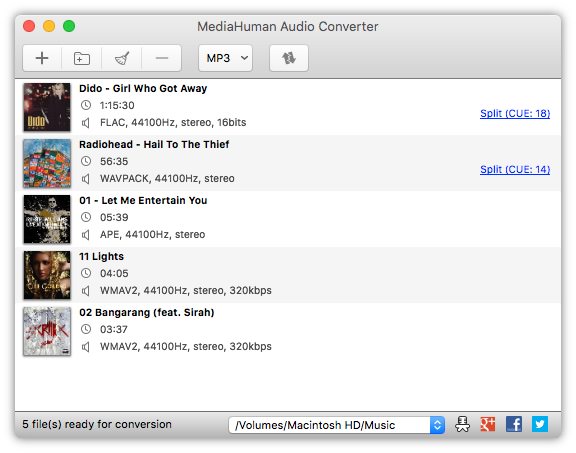
To turn WMA into MP3 on OS X, I suggest you take advantage of MediaHuman Audio Converter. This is a free application that is able to ” chew ” all the major audio file formats: WMA, MP3, AAC, WAV, FLAC, OGG, AIFF and Apple Lossless, which then allows you to convert files to WMA format in MP3 without any kind of problem. You can download the application from the official website. To do so click here, then press on the item Download attached to the web page displayed and wait for the program to be downloaded to your Mac.
Next, click on the MHAudioConverter.dmg image file that was saved on OS X and then drag the application icon to the Applications folder. Then log in to the Launchpad, locate the application icon, press on it, click on Open and then wait for the window of the program to be visible on the desk.
Now drag WMA files into the main application screen and then expand the Format drop-down menu located at the top right. In the window that opens, then select the MP3 voice from the first menu, set the desired quality for the output file (eg stereo, 44100Hz, 320kbps) in the second menu and click on the Close button to save the settings.
Finally, start the process of converting files by clicking on the button with the two arrows that is located at the top right. By default, all the songs generated by the application will be saved in the /Music/Converted by MediaHuman/ OS X folder.
Now that you have turned WMA into MP3 you can import the songs in question into the iTunes library. To do so, start the Apple media player by accessing the Launchpad and clicking on its icon and then wait for the window to be visible on the screen, click on the icon in the shape of a musical note located at the top left and then select the Music label at the top.
On the entry iTunes attached to the menu bar at the top left and then click on Preferences and then on the button Import Settings present at the entry. When inserting a CD: attached to the window displayed. Then click on the menu located next to the Import item: and select MP3 Encoder. Eventually, you can also select the final quality of the audio. To do this, indicate the desired option from the menu located next to the Settings: item. Once the changes have been made, press the OK button twice consecutively to confirm and apply the changes.
Now, presses on the File menu and choose the item Add to library, select the previously converted MP3 file that you want to put on iTunes and then presses the Open button located in the lower-right part of the new window that has been opened. Wait for a few moments so that the procedure by which to add new songs to iTunes is started and completed. Repeat the procedure I just indicated for each individual MP3 file you wish to add to the iTunes library.
As an alternative to the procedure, I just mentioned you know that you can add the WMA songs turned into MP3 to the iTunes library even by pressing the musical note icon located in the upper left part of the player window, by clicking on the Music item placed at the top and dragging directly into the program window every single audio file that you intend to import.
Next, check that the MP3 files of your interest have been correctly added to the player. To do this, just take a look at the Music section of the program you can access by clicking on the icon in the shape of a musical note linked in the upper left part of the program window.