How to delete videos from iTunes
You have an iPad that you use regularly to enjoy videos and movies around the city. For this reason, you often find yourself deleting and uploading new videos to your tablet, but to your astonishment, you have discovered that many of the movies you have deleted from the iPad, despite the daily synchronization with your computer, are still present in your iTunes.
Now you would like to get rid of it, right? So let’s not waste any more time and let’s find out right away how to delete videos from iTunes. I assure you that it is a real breeze and that with this method the movies will disappear once and for all from your personal library … so, are you ready to take action?
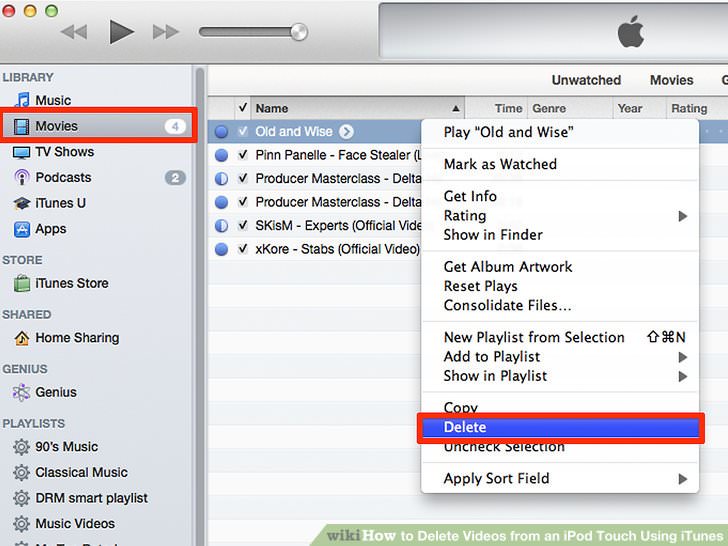
Even if you’re anything but a PC wizard, you need to be quiet, because the procedure on how to delete videos from iTunes is so simple that even a child of a few years could learn it. Then immediately start iTunes on your computer (PC or Mac the procedure is practically the same) and select the Movies item from the left sidebar.
At this point, right click on the preview of the video you want to delete from your library and select Delete from the menu that appears. In the window that opens, click the Remove button to confirm the operation, and you’re done, the video disappears forever from the iTunes library.
By completing the operation you just saw, you can delete videos from iTunes but the original files remain on your computer’s hard drive. This happens because iTunes can act freely, and effectively delete, only the files in the folder of its library and not those present in other folders on the hard disk and imported ” virtually ” into the program library.
To overcome this limitation, you can set iTunes to save to the folder that controls all the files (and thus the videos) imported into it. Be careful, because with this method, you create copies of the original files which then should be manually deleted from their original folders after being imported into the iTunes folder.
To enable automatic copying of imported files in the iTunes folder, open the program and go to the Edit > Preferences menu. In the window that opens, click on the Advanced button, put the check mark next to Copy files in the iTunes Media folder when adding to the library and click on the OK button to save the changes.
From this moment on, when you try to delete a video from your iTunes library, the program will ask you if you want to delete only the reference to the file from the library or even the actual video from the hard disk. To delete the video from both the library and the hard disk you must click on the Move to trash button.