How to export iTunes library
Have you purchased a new computer, or are you going to format yours, but do not want to lose all the files you have organized with great care in the iTunes library? Do not worry. Among the many functions of Apple’s multimedia program, there is also that to transfer and restore the contents of the library.
Follow the instructions on how to export the iTunes library I’m about to give you, and you will be able to transfer all the songs, videos and multimedia files in your iTunes library from one computer to another without problems. The procedure works on both Windows PCs and Apple computers with Mac OS X.
If you want to learn how to export your iTunes library, you should know that the first step to complete this operation is to consolidate the program library. In this way, all the videos, songs and multimedia files imported into iTunes from the various PC folders are all grouped together in the iTunes library folder (C: / Users / User Name / Music / iTunes).
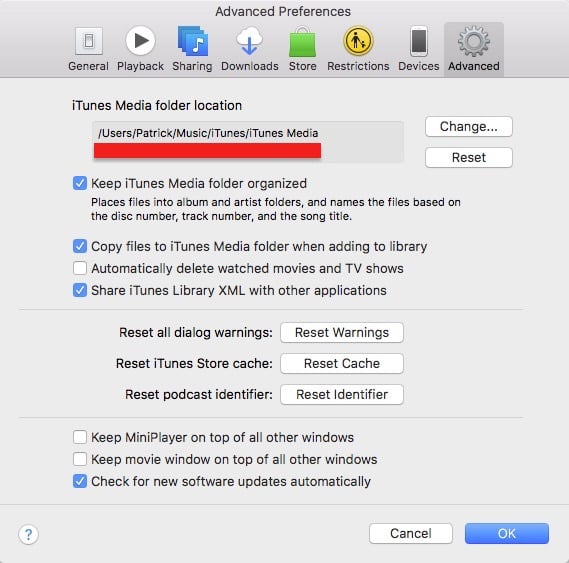
To consolidate the iTunes library, you must start the program through its icon on the Windows desktop or in the dock of Mac OS X and select the Preferences item from the Edit menu. In the window that opens, go to the Advanced tab, put the check mark next to Copy files in the iTunes Media folder when adding to the library and click the OK button to transfer all the files in the iTunes library in the folder program.
At this point, go to the menu File > Library > Organize iTunes library and, in the window that opens, put the check mark next to Consolidate files and reorganize the documents in the folder ” iTunes Media “ to consolidate the library of iTunes leaving the original files intact.
Once the consolidation operation is done, you can export the iTunes library by exiting the program and going to the folder where the Apple software stores the multimedia files. If you use Windows 7 / Vista the folder is C: / Users / Username / Music / iTunes, if you are using Mac OS X it is / Users / username / Music / iTunes / iTunes Media while on Windows XP it is in C: Documents and Settings / Username / Document / Music.
Once you have located the iTunes folder, select it with the right mouse button and transfer it to an external storage device (eg a USB hard drive) with a simple copy and paste. If your library is not bigger than 4.7 GB, you can also burn it on a DVD with any program suitable for the purpose, the choice is yours.
Now you have your complete copy of the iTunes library, so you do not have to transfer it to the other computer (or the formatted system). To do this, you need to copy the library from the external hard disk or the DVD where you first transferred it to the default iTunes folder of the PC you want to restore it to. The default iTunes folder is the one I listed above and varies depending on the operating system you use. Make sure you do it all with iTunes closed.
After completing the copy of the folder on your computer, hold down the Shift key on your PC keyboard (or the Option key if you use a Mac) and start iTunes by clicking the program icon normally. In the window that opens, click on the button Choose a library and select the folder of the library that you have just copied to your PC to complete the restoration of the library and find all your files in their place.


